Plant Humidity Sensor with MicroPython & ESP8266
Introduction
I always forget to water my plants and/or get confused when was the last time I did. No more.
I will use a soil moisture sensor connected to Adafruit IO to monitor the state of my plants in real-time. Additionnally, a one meter NeoPixel RGB strip will provide a visual feedback during the evening. That’s when I do my watering and no need to waste power for leds in bright sunshine.
For this project, I decided to use MicroPython running on a ESP8266.
Below, I will summarize the main steps of the project as well as show the final result. It won’t be a do it yourself step by step tutorial, more of a project journal where I summarize the development. I will include the full list of components, the board layout, the steps needed to setup MicroPython and all the code needed.
Components
List of all the components needed for this project.
- 1x Adafruit Feather HUZZAH with ESP8266
- 1x NeoPixel RGB strip
- 1x Sparkfun Soil Moisture Sensor
- VCC 3.3V-5.0V
- 1x 100k potentiomenter
- 1x 1k ohm resistor
- 1x 10k ohm resistor
- 1x 470 ohm resistor
- 1x 1000 uF capacitor
- 2x SPDT slide switch
- 1x led
- 1x diode
- 2x terminal block, 3 pins
Details
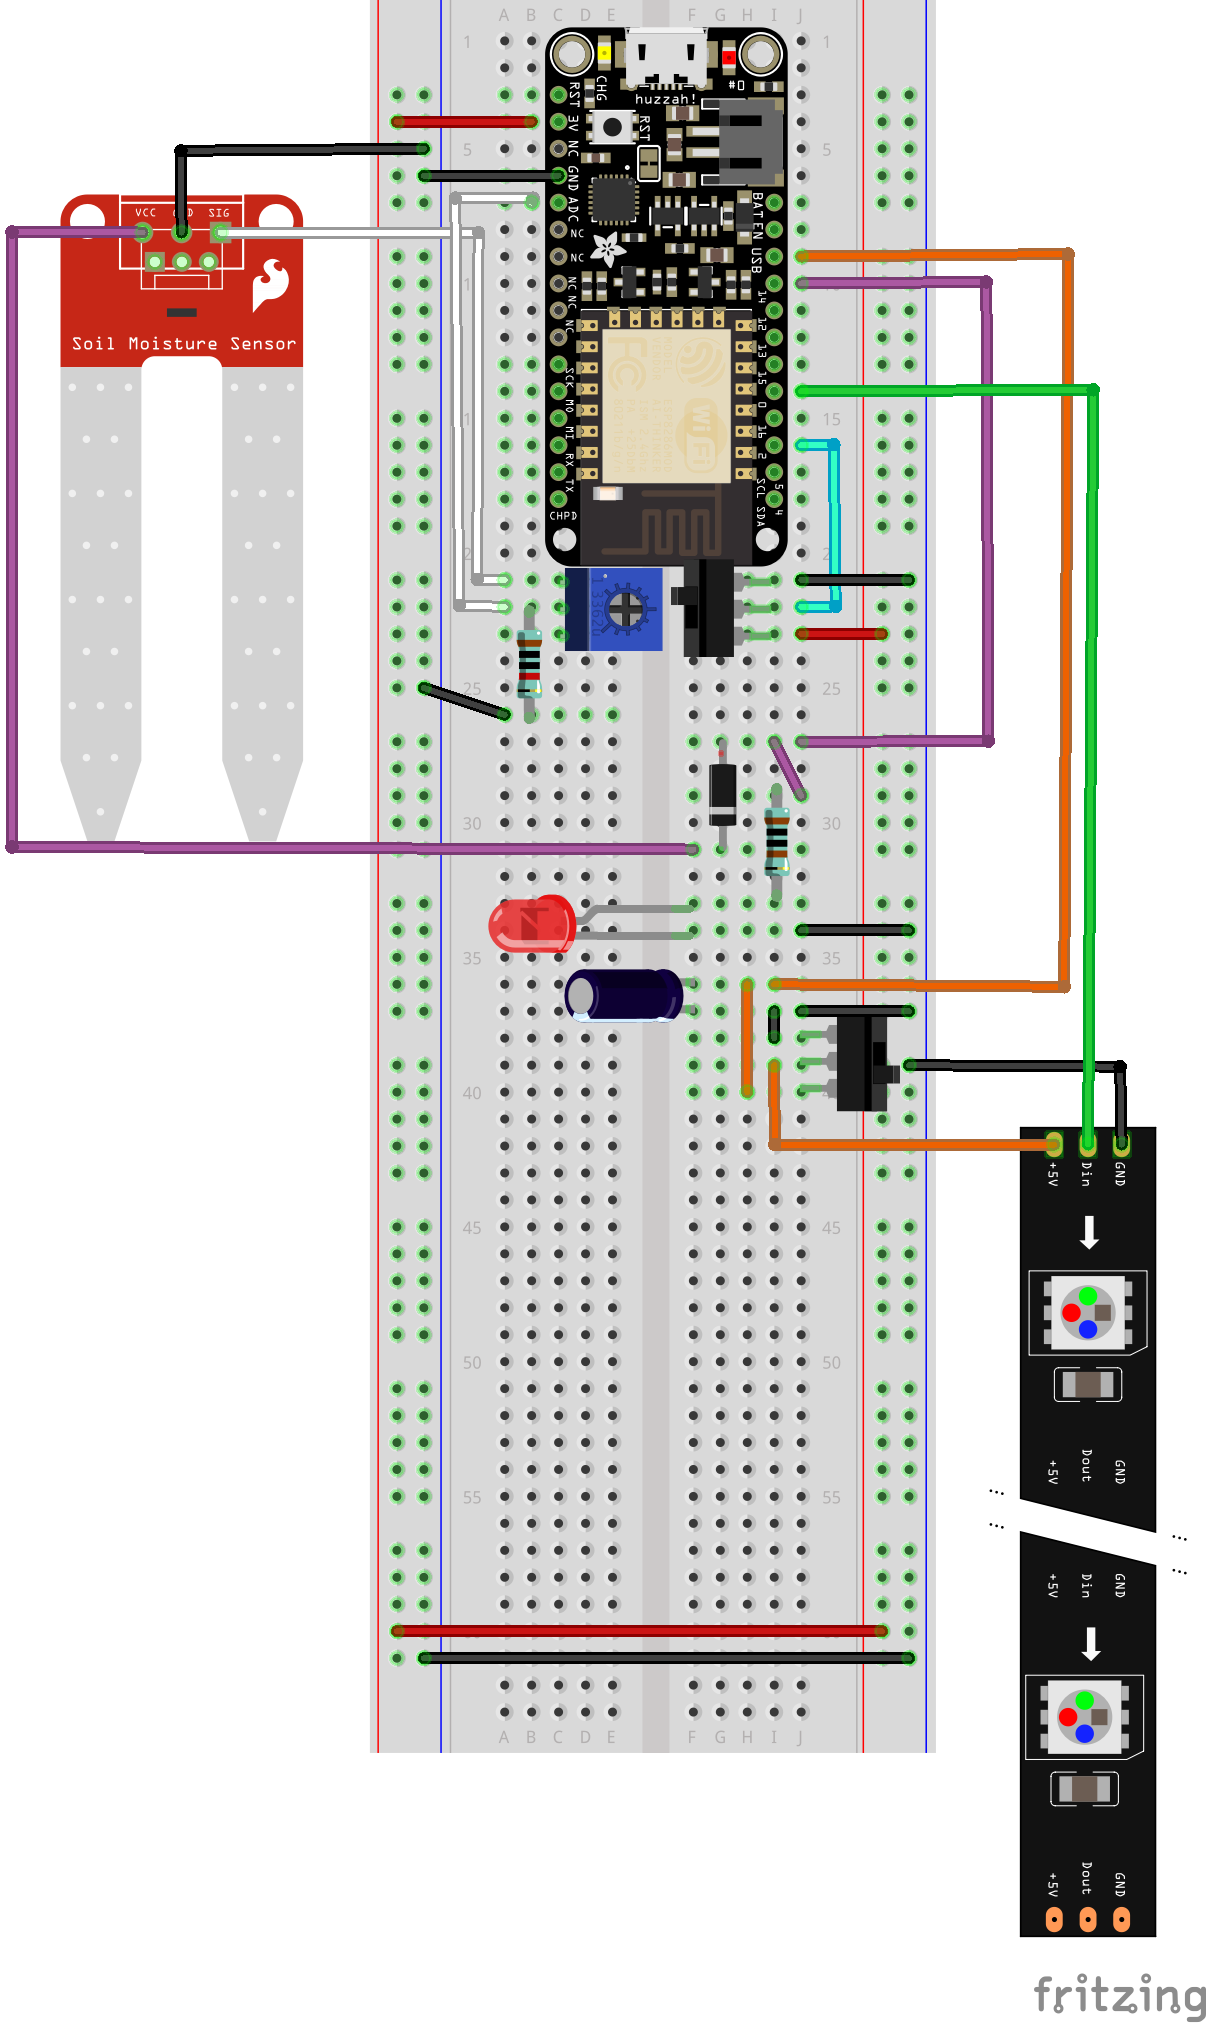
Board
A layout is first done on a breadboard.
A potentiometer is used to calibrate the moisture sensor signal. The ESP8266 ADC max input is 1.0V, therefore, depending on the type of soil and the desired mositure level, some tuning is required.
One slide switch can be used to manually turn off the NeoPixel strip (in case I get tired of the NeoPixel lights and for, whatever reason, I don’t want to water the plants).
A second slider switch is used to put the board in calibration mode (more on that later). Finally, a red led indicates when the power to the soil moisture is on.
This breadboard layout is then put on a stripboard.
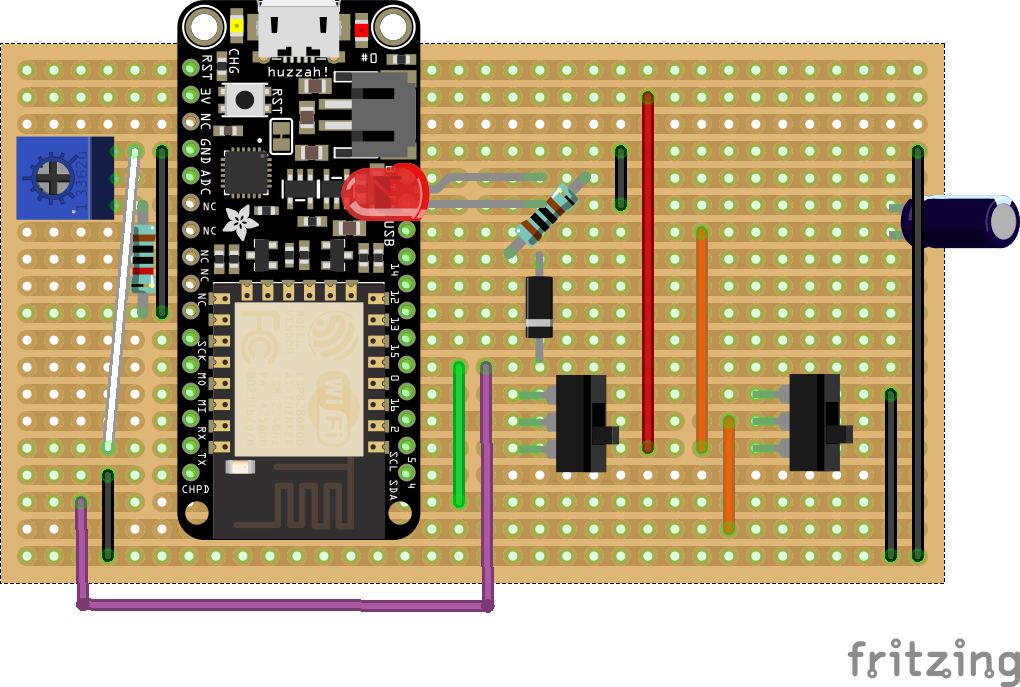
The final board, after soldering and testing is shown below.
Code
Full code is available on GitHub.
It is composed of two parts: setup and while True loop.
The setup part is:
"""Setup
"""
client=io.Client(secrets['ssid'],
                 secrets['password'],
                 secrets['aio_username'],
                 secrets['aio_key'])
client.connect()

board = Board(thresh=thresh_moisture,
              np_color=neopixel_color, thresh_n=thresh_n)
The Client class implements all the logic necessary to send data to adafruit io easily. It does also the wifi connection setup. To instantiate it needs the wifi ssid and password as well as the adafruit io username and key. The connect() function is used to initate a wifi connection. The Board class encapsulate all the board logic so that the code in the while True loop stays simple and easy to maintain.
The main loop is:
"""Main
"""
last_upd_time = 0
while True:
    # update current mode
    if not board.is_calibration_mode() and board.is_calibration_on():
        print('set to calibration mode')
        board.set_to_calibration_mode()
    elif board.is_calibration_mode() and not board.is_calibration_on():
        print('set to normal mode')
        board.set_to_normal_mode()

    # normal mode
    if not board.is_calibration_mode():
        now = time.ticks_ms()
        delta = time.ticks_diff(now, last_upd_time)
        print('delta_t: {}'.format(delta))
        if delta > delay_upd*1000:
            last_upd_time = now
            is_below, value = board.is_moisture_below_thresh()
            print('moisture {}'.format(value))
            client.send_data('moisture-sensor', value)
            if board.is_normal_mode() and is_below:
                print('set to below thresh mode')
                board.set_to_below_thresh_mode()
            elif board.is_below_mode() and not is_below:
                print('set to normal mode')
                board.set_to_normal_mode()
        board.np_animate_update()

    # calibration mode. nothing to do on update
This one should be easy to understand. Three different modes are available:
- Normal
- The moisture level is sent to Adafruit IO each
delay_updseconds. - If the moisture level is below the threshold, it sets the board in Below thresh mode.
- The moisture level is sent to Adafruit IO each
- Calibration
- During calibration, the moisture sensor is always on and no data is sent.
- Below thresh
- Data are still being sent the same way as in the Normal mode.
- NeoPixel leds are animated to indicate that watering is needed.
Setup
First, install MicroPython on the ESP8266. Follow the steps in this previous post.
Transfer the librairies and files to the board.
ampy --port /dev/tty.SLAB_USBtoUART put adafruit_io
ampy --port /dev/tty.SLAB_USBtoUART put plant_monitor
ampy --port /dev/tty.SLAB_USBtoUART put constants.py
ampy --port /dev/tty.SLAB_USBtoUART put secrets.py
ampy --port /dev/tty.SLAB_USBtoUART put main.py
```